


Firefox ရဲ့ Page Loading ကို ပိုမြန်အောင်လုပ်နိုင်တဲ့ နည်းလမ်း ( ၅ ) ခု
၁။ Pipelining ကို Enable ပြုလုပ်ခြင်း
ဒါကတော့ Friefox version တွေ အကုန်လုံးအတွက် အခြေခံကျတဲ့ နည်းလမ်းတစ်ခုပါ။ Firefox ရဲ့ address bar ထဲမှာ about:config လို့ရိုက် Enter ခေါက်လိုက်ပါ... သတိပေးတဲ့ message ပေါ်လာပါလိမ့်မယ်။ I'll be careful, I proxise! ဆိုတာကို click ပါ။ ပြီးရင် network.http.pipelining နဲ့ network.http.proxy.pipelining ဆို တာတွေကို လိုက်ရှာပါ။ မတွေ့ရင် အပေါ်က Filter ထဲမှာ ရိုက်ပြီး ရှာလိုက်ရင်လည်း ရပါတယ်။ တွေ့ပြီးဆိုရင် ၎င်းတို့ပေါ်မှာ double click လုပ်ပြီး values တွေကို true လို့ပေးလိုက်ပါ။ ပြီးရင် network.http.pipelining.maxrequests ပေါ်မှာ double click လုပ်ပြီးရင် ၎င်းရဲ့ value ကို 8 လို့ပေးလိုက်ပါ။
၂။ Content switch threshold ကို လျှော့ချခြင်း
အကယ်၍ သင့်ရဲ့ mouse (သို့) keyboard ကို မရွှေ့ မထိပဲ 0.75 စက္ကန့် (Content Switch Threshold ) ကြာခဲ့မယ်ဆိုရင် Firefox ဟာ frequency နိမ့်တဲ့ interrupt mode ထဲကို ရောက်သွားပါလိမ့်မယ်။ ဆိုလိုတာကတော့ ၎င်းရဲ့ ကြားခံဆက်သွယ်ပေးတဲ့စနစ်ဟာ တုန့်ပြန်မှုနည်းလာပါလိမ့်မယ်...ဒါပေမယ့် သင့်ရဲ့ page loadတွေကတော့ ပိုပြီးမြန်ဆန်လာမှဖြစ်ပါတယ်။ ဒါကြောင့် အခုလိုပိုပြီးမြန်ဆန်လာစေဖို့ Content Switch Threshold ကို လျှော့ချပေးဖို့လိုပါတယ်။ about:config ကိုရိုက် Enter ခေါက် ပြီးရင် ပွင့်လာတဲ့ windows ပေါ်မှာ right-click လုပ်၊ ပြီးရင် New ထဲကမှာ Integer ကို click ၊ အဲဒီနောက် content.switch.threshold လို့ရိုက် OK ပေး ပြီးရင် 250000 ( a quarter of a second ) ကိုထည့် OK ပေးလိုက်... ဒါဆိုရပါပြီ။
၃။ Flash ကို Block ခြင်း
Flashblock extension ကို Install လုပ်ဖို့လိုက်ပါ။ ( http://flashblock.mozdev.org တွင် download ပြုလုပ် ပါ။) ၎င်းက Flash appletတွေ အားလုံးကို loading ပြုလုပ်ခြင်းမှာ block လုပ်ပါလိမ့်မယ်။ ဒါကြောင့် web pages တွေဟာ ပိုပြီးမြန်မြန်ဆန်ဆန် ဖော်ပြပေးပါလိမ့်မယ်။ အကယ်၍ Flash content အချို့ ကို ရှာဖွေချင်တယ် ဆိုရင်တော့ ၎င်းရဲ့ Placeholder ကို download အတွက် click လိုက်ခြင်းအားဖြင့် ပုံမှန်အတိုင်း applet ကို ပြသပေးပါလိမ့်မယ်။
၄။ cache အရွယ်အစားကို တိုးစေခြင်း
သင် web တစ်ခုကို ဖွင့်ကြည့်လိုက်စဉ်မှာ Firefox က site ရဲ့ images နဲ့ scriptတွေ ကို local memory cache တစ်ခုထဲမှာ သိမ်းဆည်းထားလိုက်ပြီး အကယ်၍ သင်က တူညီတဲ့ page တစ်ခုကို ပြန်ပြီးဖွင့်မယ်ဆိုရင် locak memory cache ကနေ သိမ်းထားတဲ့ အချက်အလက်တွေကို ပိုပြီး မြန်မြန်ဆန်ဆန် ပြန်ထုတ်ပေးနိုင်ပါတယ်။ သင့်မှာ RAM အများကြီး( 2GB နဲ့အထက် ) ရှိတယ်ဆိုရင် ဖွင့်ပြီးသား page တစ်ခုကို ပြန်ဖွင့်တိုင်းမှာ မြန်မြန်ဆန်ဆန်ဖွင့်လို့ရစေဖို့အတွက် cache size ကို တိုးထားသင့်ပါတယ်။ ဒီ့အတွက် about:config လို့ရိုက် Enter နှိပ် ပြီးရင် ပွင့်လာတဲ့ window ထဲက ဘယ်နေရာမှာမဆို right-click ပြီးရင် New ထဲက Integer ကိုသွားပါ။ အဲဒီထဲမှာ browser.cache.memory.capacity လို့ရိုက် OK ပေး၊ ပြီးရင် ၎င်းပေါ်မှာ double-click လုပ်၊ value ကို 65536 လို့ရိုက် OK ပေး၊ အဲဒီနောက် သင့်ရဲ့ browser ကို restart ပေးလိုက်ပါ။
၅။ Render မြန်စေခြင်း
ကြီးမား ပြီး ရှုပ်ထွေးတဲ့ web pageတွေကို ဖွင့်တဲ့ အခါမှာ အချိန်တော်တော်ကြာတတ်ပါတယ်။ Firefox က သင့်ကို မစောင့်စေချင်ပါဘူး ... ဒါကြောင့် 0.12 စက္ကန့်တိုင်းမှာ ရရှိတဲ့အချက်အလက်တွေ(content notify interval)ကို default အားဖြင့်ဖော်ပြပေးပါတယ်။ ဒီလိုအချိန်တွေမှာ browser ဟာ တဖြည်းဖြည်း ဖျက်ကနဲ့ ဖျက်ကနဲ ဖော်ပြပေးပြီး တိုးလာတဲ့ စုစုပေါင်း page loading လုပ်တဲ့ အချိန်ကိုလည်း မကြာမကြာလျော့ကျစေပါတယ်။ ဒါကြောင့် ကြီးမားတဲ့ content notify interval ဟာ ပိုပြီး မြန်ဆန်စေပါလိမ့်မယ်။ ဒီ့အတွက်... about:config ကိုရိုက်၊ Enter နှိပ်၊ ပြီးရင် ပွင့်လာတဲ့ Window ရဲ့ တနေရာရာမှာ right-click ( Apple userတွေအတွက်က ctrl-click)လုပ်၊ New ထဲက Integer ကို click ပြီး preference name ကို content.notify.interval လို့ရိုက် OK ပေး ပြီးတော့ 500000 ( ငါးသိန်း) လို့ရိုက်ထည့် ပြီးရင် OK ထပ်ပေးပါ။
Window ထဲမှာ right-click ထပ်လုပ်ပါ။ ပြီးရင် New ထဲက Boolen ကို click ပါ။ ဒီတကြိမ်မှာတော့ content.notify.ontimer ဆိုတဲ့ value တစ်ခုပြုလုပ်ပြီး True ပေးလိုက်ပါ။ ဒါဆိုပြီး ပါပြီ။
Password Hacking
အကယ်၍ သင်က သင့်ရဲ့ browser မှာရှိတဲ့ Tools > Options > Security ထဲမှာ Remember password for sites ကို check ပေးထားမယ်ဆိုရင် site တစ်ခုကို ဝင်တဲ့ အခါတိုင်းမှာ notification bar တစ်ခု ပေါ်လာပြီး username နဲ့ password ကို save လုပ် မလုပ်ဆိုတာ မေးပါလိမ့်မယ်။ အကယ်၍ uncheck လုပ်ထားရင်တော့ မေးမှာမဟုတ်ပါဘူး။ check မပေးထားလည်းပဲ အလိုအလျှောက် save လို့ရအောင် javascrpit ဖိုင် တချို့ ကို ပြုပြင်လိုက်ရင်လည်း အလိုအလျှောက် save လုပ်နိုင်ပါတယ်။ ဘယ်လိုလုပ်ရမလဲဆိုတာကို တချို့ Social Site တွေမှာလည်း ဖော်ပြထားတာတွေ့တဲ့အတွက် မဖော်ပြပေးတော့ပါ။ နောက်တစ်ခုက Bookmoark Sync ကို သုံးပြီးတော့လည်း Firefox မှာ username နဲ့ password တွေကို save လို့ရပါသေးတယ်။
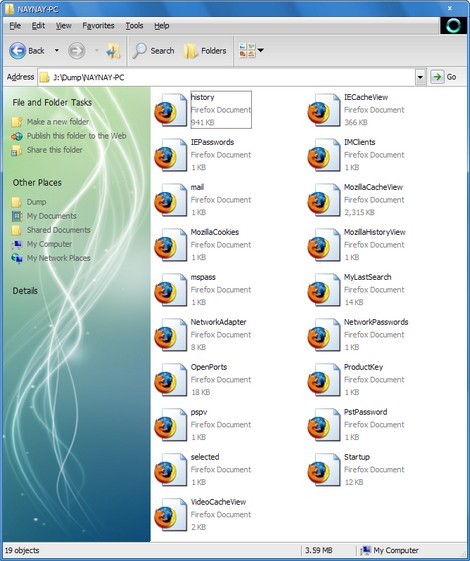
အခု လို save လုပ်ထားတဲ့ password တွေကို ဘယ်လို hack လို့ရနိုင်သလဲ ဆိုတာကို ဖော်ပြပေးပါမယ်။ hacking လို့ ခေါင်းစဉ်တပ်ထားပေမယ့် ဒါဟာ အမှန်တကယ် hacking တစ်ခုတော့ မဟုတ်ပါဘူး ။ Firefox ဟာ သင့်ရဲ့ computer ပေါ်မှာ အမျိုးအမျိုးသော သတင်းအချက်အလက်တွေကို သိမ်းဆည်းနိုင်တဲ့ bookmarks, plugins နဲ့history ကဲ့သို့ profile directory တစ်ခုကို ဖန်တီးပါတယ်။ အဲဒီမှာ ဖိုင် နှစ်ခုဟာ password တွေကို သိမ်းထားဖို့အတွက် အသုံးပြုလေ့ရှိပါတယ်။
၁။ key3.db - ဒီဖိုင်က save ထားတဲ့ passwordတွေကို encrypt လုပ်ပြီး encryption key ရဲ့ copy တစ်ခုကို သိမ်းထားပါတယ်။
၂။ signons.txt, stgnons2.txt (သို့) stgnons3.txt - ဒီဖိုင်တွေက save လုပ်ထားတဲ့ passwords တွေကို သိမ်းထားပါတယ်။ ၎င်းတို့ဟာ encrypt လုပ်ထားတဲ့ passwords နဲ့ Logonတွေပါဝင်တဲ့ ရိုးရိုး text file တွေဖြစ်ပါတယ်။ signons.txt file ကတော့ Firefox version 2 အစောပိုင်း version တွေမှာ အသုံးပြုပြီး signons2.txt ကတော့ Firefox version 2.0.0.2 နဲ့ နောက်ပိုင်း version တွေမှာ အသုံးပြုပါတယ်။ Firefox 3 နဲ့ နောက်ပိုင်း Version အသုံးပြုသူတွေကတော့ signons3.txt file ကိုရှာရပါမယ်။ signons3.txt file ကို signons.sqlite နဲ့ ဖုံးအုပ်ထားပါတယ်။
ဒီ file တွေကို ဘယ်မှာ ရှာရမလဲဆိုတော့ Profile directory ထဲမှာ ၎င်း fileတွေကို သိမ်းထားပါတယ်။ အောက်မှာဖော်ပြထားတဲ့အတိုင်း Run ထဲမှာ ရိုက်ထည့်လိုက်ရင် operating system ပေါ်မှာ ပြုလုပ်ထားတဲ့ profile folder ထဲကို browsing လုပ်ခြင်းအားဖြင့် ဝင်ရောက်နိုင်ပါတယ်...
Windows 7/Vista/ XP : %APPDATA%\Mozilla\Firefox\Profiles\
Mac OS : ~/Library/Application Support/Firefox/Pofiles/
အကယ်၍ သင့်ရဲ့ Profile directory ကိုမတွေ့ဘူးဆိုရင်တော့ Mozila support page မှာ သွားကြည့်ပါ။
၎င်း file နှစ်ခုကို တစ်ခြားcomputer တစ်ခုဆီသို့ copy ကူးပြီးပို့လိုက်လို့ရပါတယ်...။ သင်ဟာ password တွေကို save လုပ်မိမယ်ဆိုရင် အဲဒီဖိုင်တွေထဲမှာ သင့်ရဲ့ password ပါသွားပါပြီ။ encrypt လုပ်ထားတဲ့ password တွေကို ရှာဖို့အတွက်က Fire Password Viewer ကို အသုံးပြုနိုင်ပါတယ်။
Hacking Network Connection
၁။ server ပေါင်းစုံမှ connection ကို ရနိုင်သမျှရအောင်...
about:config ထဲမှာ network.http.max-connection ဆိုတာရှိပါတယ်။ ၎င်းက များစွာသော network connection တွေကို ထိန်းချုပ်ပြီး Firefox က Web servers အရေအတွက် ဘယ်လောက်များများ တကြိမ်ချင်း ပြုလုပ်ပါတယ်။ အကယ်၍ သင်ဟာ tabတွေ အများကြီးနဲ့ home page အမျိုးမျိုးကိုဖွင့်လို့အဆင်ပြေစေဖို့ (သို့) အမျိုးမျိုးသော server တွေနဲ့ ချိတ်ထားတဲ့ pageတွေကို ဝင်ရောက်ချင်တယ် ဆိုရင် network.http.max-connection ပေါ်မှာ double click လုပ်ပြီး value ကို 32လို့ထည့်ပေးလိုက်ပါ။
၂။ တူညီတဲ့ server မှ connection ကို ရနိုင်သမျှရအောင်...
about:config ထဲမှာရှိတဲ့ network.http.max-connections-per-server ကတော့ သီးခြား connection တွေအတွက် ထိန်းချုပ်ပါတယ်။ page တစ်ခုထဲမှာရှိတဲ့ element မျိုးစုံကို အပြိုင်download ချနိုင်ဖို့ ခွင့်ပြုတဲ့ တူညီတဲ့ server အတွက်ပဲ အလုပ်လုပ်ပါတယ်။ network.http.max-connections-per-server ကို double-click လုပ်ပြီးရင် value ကို 16 လို့ထည့်လိုက်ပါ။ ဒီထက်တော့ ထက်မမြှင့်ပါနဲ့တော့ ဘာလို့လဲ ဆိုတော့ အချို့ site တွေက bandwidth-protection (သို့) antileeching measure အတွက် သင့်ကို block ပါလိမ့်မယ်။
Hacking Addon
Hacking Addon တွေကို အသုံးပြုချင်ရင် https://addons.mozilla.org/en-US/firefox/tag/hacking မှာ ရယူနိုင်ပါတယ်။
အခု အပေါ်မှာ ပြောခဲ့တာတွေက Firefox ကို hack နိုင်တဲ့ နည်းလမ်းတွေထဲက အနည်းငယ်ကိုသာ ဖော်ပြခဲ့တာဖြစ်ပါတယ်။ အပြည့်စုံဆုံး နဲ့ အများကြီးသိချင်တယ် .... ကလိချင်တယ် ဆိုရင်တော့ အောက်မှာ ပေးထားတဲ့စာအုပ်ကို ဖတ်ဖို့အကြံပြုပါရစေ...

(Educational Purposes Only)